Pages

Tuesday, January 31, 2012

Spotlight on the Gauls

The Gauls were a Celtic people living in Gaul, a region roughly covering what is now France, Belgium, Switzerland and Northern Italy.  The Gauls had the great misfortune of sharing a border with the Romans and the two were often at war.  The Gauls managed to sack Rome in 387 BC and as a consequence, the Romans had a deep fear and hatred for them that lasted until they were conquered by Caesar in 50 BC. When Hannibal invaded Italy during the second Punic war, a number of Gallic tribes joined him and contributed to his many victories over the Romans.  That didn't help the Roman "fear and loathing" either, I bet.  

This was a project that I fell into rather than planned thanks to a bargain on Bartertown for an unpainted Old Glory Gallic Starter Army with Litko bases.  I snapped it up and then began to wonder what I'd been thinking.  The rumors are true...painting a Gallic Army is a test of endurance. Of the 184 figures of Heavy Foot in this army, every one has a unique color scheme and that's why painting Gauls is so tough. I'd suggest  a simple cheat to speed things up.  Select 4 to 8 color combinations/patterns that you really like.  Mount the like-posed figures together on Popsicle sticks. Paint each stick with the same scheme and when you're finished, make sure that you don't put the same pose/colors next to each other.  I believe a smaller set of color combinations would make this army more pleasing to the eye than the "every man in unique" technique I employed.  When I was halfway through this project, my son walked in, looked the figures over and said, "It looks like a clown army!"


Heavy Foot:  The first set of pictures is all 46 bases of Heavy Foot.  One of the challenges in running Gauls is that you have to decide early on whether you want to run them as Heavy or Medium Foot.  Given all the Roman armies in our club, this was an easy decision for me. I chose to build them as Heavy Foot.  To run them as Medium would give me more speed and the ability to go into terrain but at the cost of being extra brittle when losing to heavy foot and cavalry.


Soldurii:  In Field of Glory, the Soldurii represent a well armored, elite bodyguard.  As armored elite heavy foot, they're the single killer unit the Gauls get to field. You can only take 6 bases of Soldurii so use them wisely!


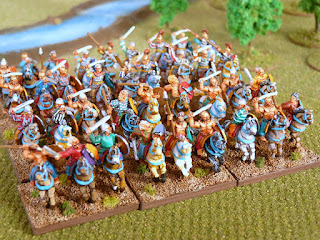
Cavalry:  If you're going to run Gauls in FoG, this is where you need to figure out a way to win.  Running an army of protected, average, undrilled Foot is a challenge in the ancient world.  I put together a lot of cavalry and chariots in hopes that I could win on the wings in battle.


 Chariots:  Chariots are quite expensive and also, labor-intensive to build. Make sure you have a pin drill handy for assembling these.  Still, it's a nice visual effect when you put them all out on the table in a single file!
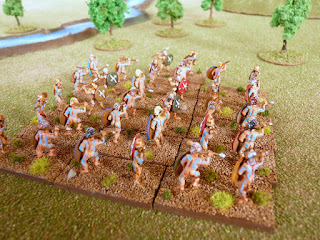
Slingers: The Gallic list is a light on skirmishers so I consider these fellows a must-have.  This was the first time I utilized "black lining" and I was pleased with the results.


Javelinmen:  One of the great things about having teenage children is that my very existence can be an embarrassment to them. When my daughter saw that these Javelinmen were going to be  fielded with no clothes, she asked if I was going to take them out in public. I explained  that the Gallic proclivity to fight sans pants is well known amongst history geeks and thus, I wouldn't be embarrassing myself by fielding nude figures. Well, at least not these figures.  I was quite careful in applying highlights and washes  to these figures as I didn't want to draw too much attention for reasons of, um, modesty!

A quick note about the tattoos.  I started with dark blue but kept working my way up for something that popped. The sky-blue looks great to the naked eye (get it?) but I couldn't get a shot that captured that effect with my camera.  In these shots, it just looks washed out.  


Commanders:  I put my Commander in Chief in a Chariot.  All the better to run away when things go south, I suppose.


Camp:  This camp is nearly scratch made. The tent is made out of paper towel and toothpicks. The large rocks are actually driftwood from the North Shore.  Okay, so I didn't scratch make the 2 figures or the tree but for me, this is pretty good!


I enjoy my Gauls for their color and vibrancy.  I also enjoy their "lost cause" history.  They dared to stand up to Rome and were crushed under her heel.  If you are thinking of painting up a Gallic army, one of the big pluses is how easily they morph into the other "barbarian" armies of the period such as:

1.  Galatians
2.  Picts
3.  Early Germans
4.  Early British
5. Teuton and Cimbri

While Roman versus Gauls is a tough matchup for Gauls in FoG, they have a fighting chance in Impetus.  This weekend, I'm going to take these boys out of the box and run them against my newly painted Mid Republican Romans.  Large Unit and the Impetus bonus should give the Gauls a fighting chance to win.  While this army is based for FoG, I can field it in Impetus as long as I make sure that the units are no more than two bases wide.    Brent put dibs on the Gauls and I suspect he's going to hit me with the dreaded "Boar's Head" formation to cave in my thin red Roman line!  

Friday, January 27, 2012

Method Painting

You're probably familiar with the term "method acting." In case you are not, method acting is a technique used by actors to immerse themselves in a character so deeply that they'll sometimes continue to portray them even when offstage or off-camera.  I've been utilizing "method painting" lately while painting my Romans.  In my version, I immerse myself in the era and army which I'm painting so deeply that I can forget what period I'm inhabiting! Method painting is the first step to creating the Perfect Gaming Trifecta:

Step 1.  Immerse yourself in the era and army.
Step 2.  Paint the army.
Step 3.  Bring it all home by fielding the army on a tabletop!

The great thing about method painting Romans is the enormous amount of material available to immerse yourself in. I'm going to give a Top 3 recommendation for my favorite sources of inspiration for painting Romans this month.  If you sample any of these, don't be surprised if you get sucked in and discover a Roman army project has appearred on your plate. The list please!
Dan Carlin's Hardcore History podcast, Shows 34-39 "Death Throes of the Roman Republic."  Dan's 5 shows give you a thrilling 13 hour ride through the end times of the Roman Republic. I was so smitten with this excellent series that I've become a subscriber to Carlin's podcasts. He is off the charts good and I'm working my way through all of his podcasts.  I like to listen to them while I paint and I'll listen two or three times through just to make sure that I catch everything. Did I mention that his current shows are free?

Greece and Rome at War by Peter Connolly:  This is a superbly illustrated study of a tactics, soldiers, equipment and campaigns of both the Greek and Roman armies. Connolly is an excellent illustrator and his art is an inspiration for any hobbyist or historian.   This book serves as an excellent reference source and inspiration.  As a painter, you can never have too many reference books and this one earns an A.
Rubicon: The Last Years of the Roman Republic by Tom Holland: This book is a riveting narrative of the final years of the Roman Republic. It is full of larger-than-life characters like Marius, Caesar, Pompey, Mark Anthony, and the Poison King, Mithridates, just to name a few.   To give you just a small taste of what's in store,  here is a quote directly from the book:

"The mines that Rome had annexed from Carthage more than a century previously had been handed over to the publicani, who proceeded to exploit them with their customary gusto. A single network of tunnels might spread for more than hundred square miles, and provide upwards of 40,000 slaves with a living death. Over the pockmarked landscape there would invariably hang a pall of smog, belched out of the smelting furnaces through giant chimneys, and so heavy with chemicals that it burned the naked skin and turned it white. Birds would die if they flew through the fumes. As Roman power spread, the gas clouds were never far behind."

Wow!  So there you have it.  3 recommendations that'll put you knee-deep in the Roman era.  I confess that I just discovered a downside to method painting.   Today, I went down to the kitchen in my purple trimmed toga expecting a breakfast fit for a Caesar.  Instead, it seems I interrupted my wife and two children conspiring against me in whispered tones. I think they've read "Rubicon" too and now they know how Caesar meets his end.  I've only got until March 15th to figure out which of them is Brutus!

Saturday, January 21, 2012

The Black Army takes the field

Today saw my Later Hungarian army on the tabletop for the very first time.  Brandt promised to bring down an army to "help" me field test my army and he did not disappoint.  

My Later Hungarian Army:
Hungarian Nobles (Knights) x 2

Szeklers x 3
Serbian Hussars x2
Hungarian Light Horse Archers x2
Clipeati & Armati x 2
Handgunners x 2
Foot Archers x1
Troop commanders x 4


Brandt's Mamluk Egyptian army:
Mamluks x2
Halqa x3
Sultans own mamluks x2:  Armored Elite drilled bow swordsmen!
Turkoman x2 
Bedouin  x 1
Field commander x1, Troop commanders x 2

His list was a rude awakening for me because it was all mounted with mostly armored, superior, drilled, bow, swordsman and four units of Lancers!  Unit for unit, his cavalry generally outclassed mine except for my Knights.  I had a lot of foot troops and I realized my Defensive Spearmen were going to have trouble getting into a game with mounted troops.Brandt's quality army versus Monty's quantity. As they say in Canada, who will win out, eh?

The first twist of the game was that of the 10 pieces of terrain, 8 ended up on Brandt's side. Since I lost initiative and had the first move, I decided to try to jam Brandt's army as moved up and out the terrain on his half of the board. There was a vineyard in the middle of the table which counts as difficult terrain and it basically cut the battlefield in two. I stacked my Knights on the right side of the battlefield and planned to conduct a delaying action on the left side against Brandt's best troops, The Sultan's Own Mamluks.   


I paired each Hungarian light horse with Serbian hussars and sent them on double moves to delay on the far left and right flanks. The downside to this strategy was that my Hussars took a great deal of bow fire and each ended up disrupted, neutralizing them.  The upside was that they did slow the Egyptians out of the gates and made a nuisance of themselves.
On my right flank, my Knights made good progress, although one battle group almost got sucked into a trap due to its impetuousness and a charge without orders.  One more inch of pursuit and they would have been in trouble from the start.  As luck would have it, they ended up just short of offering a flank to the Halqua and their lances. My second unit of Knights got extremely lucky and was able to catch an evading unit of Halqua from behind.  In short order, the Halqua were broken from the field.  The saving grace for the Egyptians was that the pursuit phase put my Knights far away from the critical action on my right flank.

In what would turn out to be the critical match up of the game, 2 units of Halqua charged a single Knight unit.  Against all odds, this matchup would grind on for 4 or 5 turns. Brandt's dicing was insane at times, with him rolling a 12, a 12, and 11 for morale checks in 3 consecutive turns.  Whichever side broke first would open up a hole which the other side could exploit and win the day.  
On my left, the 2 units of Sultan's Own Mamluks each got in a charge against Szelker Cavalry.  I knew I had to hold these guys up if I wanted to have a chance so I threw my commanders into the front lines in each of the melees.  In one  turn, Brandt killed 2 of my 4 commanders!  Ahhh!  Fortuna was starting to frown on me.  How could I make her smile instead?  The game teetered on a knife's edge!  Could my Szelkers hold long enough for my Knights to win on the right? Things were so desperate that I did the unthinkable and threw my King into the front lines to rally the weary Knights.  Brandt Kingslayer salivated at the chance to collect the head of Matthias Corvinus.
Finally, my superior numbers kicked in. I was able to sneak foot archers through a vineyard and up into the Egyptian camp for a quick 2 points. I threw a unit of Szeklers into the all-important scrum with my Knights and King, giving me extra to dice for melee. And I was able to bring my 2nd unit of Knights in with a rear charge on the enemy, putting Brandt over the break point as I myself went fragmented. Game goes to the Black Army!  And the King lived!  Long live the King!
This was a close run thing.  I was mentally exhausted at the end of this 5 1/2 hour marathon match. Medieval match-ups tend to be quicker than ancient games in Field of Glory but this was the exception!  Plus, I have to say that Brandt is one of the toughest match-ups in our club and proof is that this is was the very first time I've beaten him.  Great game, fascinating match-ups and both Brandt and I plan to tweak our lists just a bit.

Lastly, let the record to show that the Mountain Dew vending machine was broke today and I was unable to sustain myself with the sweet nectar of the gods as is normally my practice when I get tired. In the alternate, I tried a can of Red Bull and wow, does that taste bad!  Plans for a Red Bull sponsorship for my Hungarian army in Field of Glory tournaments are definitely off!   

Thursday, January 19, 2012

Mid Republican Romans-Impetus style

After my first game of Impetus, I decided to use my Xyston Mid Republican Romans (Christmas present!) to create my first Impetus army.  Despite the obvious hazards of embarking on a solo project like this, I had good reasons to do so.  First, I really wanted to try the modelling and diorama aspect of Impetus, with each unit set on a single large base with less figures.  Second, Impetus has intriguing rules for Mid Republican Romans.  Hastati and Principes get pilum prior to melee as long as they're not disordered and Hastati and Principes from the same legion can swap places (Line Relief) in some circumstances.  Also, the Roman versus Gaul match-up looks excellent with the Gauls having a chance to win.  I have a huge Gallic army that is sitting and gathering dust so Romans will give them a chance to get back on the tabletop. Did I mention that Impetus is fun?  Oh, yea, that too!

So, how did it turn out?  I'll let you be the judge with a spoiler pic of the finished product and then we'll work backwards...kind of like a movie where the end is played out in the first minutes of the film!

The first step of MRR project was to decide how many figures to put on a 80mm x 40mm base to represent the Hastati and Principes units.  The authors' suggest that Heavy Infantry should be depicted in close ranks.  Other than that, the number of figures is left up to the player.  I started with a minimalist option.
I posted this picture at The Miniatures Pages and asked Impetus players for their input. Could 6 figures represent a unit of Hastati?  Nope, it was unanimously voted down.  The consensus was that 9-10 figures looked about right for heavy infantry.  It was also suggested that I get away from putting every figure in a neat and perfect line to make the unit look more alive and vibrant.  Check.    
Having cracked the code on basing, I moved on to painting. Like many hobbyists, I sometimes get compulsive, even obsessive, about painting. Once I pitched in, I went after it with a vengeance.  In 8 days, I painted, based and flocked 5 units of Hastati and 5 of Principes.  For the folks keeping track at home, that's 100 figures total. I've never pulled so many hours of painting in such a short window of time.  The thing is, once I started, I just HAD to know how the finished product would look and the only way to satisfy my curiosity/obsession was to push to the finish as quickly as possible.  I'm very pleased with how these turned out!  

The front rank units are Hastati in red and white tunics.  The second line is Principes in chainmail.  I put commanders and standards on only two of the units, both Principes, because in Impetus, the commander can be with a unit and the visual representation tells your opponent where your commander is.


Before I wrap up, I want to make a few comments about Xyston Miniatures for anyone who is thinking of painting up an army of their figures.  Much of life is about managing expectations and fair or not, my expectations were sky high for these figures as I'd read Xyston has some of the best sculpts in 15mm. My enthusiasm was initially dampened when I had to use a pin drill to drill out the hands on 100 figures to glue a spear or pilum.  Then I glued on 100 shields.  There was a quite a bit of flash on the figures but after two nights of cleaning flash, drilling and gluing, the fun began.  These are excellent figures with great detail and that made painting them a joy. Prep work aside, I plan to buy more Xyston armies and  I highly recommend their 50mm wire spears.  They're a very nice upgrade over the wire spears I was using.  I also really love all of the extras they sell such as casualty figures, extra shields, swords and even dogs.  Up next, 5 units of Velites.

Last but not least, I had a package today all the way from Italy.  Mailing was 17 Euros and at that price, I suspect the Impetus rules and supplement came over on their own container ship!


Sunday, January 8, 2012

Impetus Test Drive

I'd planned to play my first game of Impetus over the holiday but then my wife learned she needed surgery to remove and replace the plate and screws that were put in her jaw in early December.  Ouch!  December was a very rough month for my wife but I'm pleased to report she's up and getting stronger every day.  We even got in a walk tonight just like old times.  Life is much brighter now that she's on the mend.

Saturday, I had to drive my son to a 3 hour practice with the Minneapolis Youth Orchestra in Highland Park.  I remembered my friend Brent and his offer to teach me Impetus.  Looking at a map, I saw that he was somewhat near where I'd be waiting for my son.  A couple of emails later, I was at his house for my first game.  On the table waiting for me was a beautiful Anglo-Saxon shieldwall versus impetuous Norman Knights!
In Impetus, players dice for initiative by command each turn, adding the leadership bonus of their commanders. This adds an element of unpredictability as it is possible for a player to have back to back moves.  Brent won initiative and quickly went to work.  I'm pleased to report that he did not seem to go to easy on me.  He formed his Saxons into "large units" and then went into a shield wall on top of series of hills.  I could plainly see that this would be a tough nut to crack!

His javelinmen came out and got a hit on a Knight unit which happened to be where my commander was attached.  In Impetus, a commander is either attached to a unit for the entire game or he is unattached and off the board.  Having the commander attached to a unit means that his command range is measured from the unit whereas command range for an unattached commander is measured from the back of the playing field.  The commander also adds bonuses to the attached unit but you must take care because if the unit is lost, the commander bonuses are lost as well for the rest of the army.  The hit on my command unit caused a chain reaction.  It put my knights into disordered status which meant that being impetuous, they'd have to take checks to keep from charging across the field at the nearest enemy every turn. I knew that if my command unit went careening across the battlefield into a shield wall by itself, this would be a quick game.  I decided to advance across-the-board with the rest of my troops, hoping that I could bring the unit out of disorder and back into Opportunity (kind of like stand-by) before it was too late.  The downside to this strategy is that I had six units of impetuous knights eager to tear across the field and crash into the shield wall instead of just one!
I managed to bring the command unit back under control but on my far right, two units of knights plunged forward.  Brent's far left and far right flanks were anchored by his weaker troops.  Since things were unraveling from the go, I decided to double move my knights to get a charge in.  A double move was risky because at the end of the first move, I had to pass a discipline test to see if the units went disordered.  If the knights went disordered, they'd lose their "impetus" dice in addition to the disorder penalty during the charge.  I passed the discipline test and crashed into the Saxons in good order.  Fistful of dice were thrown and the Saxons were beaten!  The Saxons retreated and the knights pursued and hit them again!  This time, the Saxons routed and in pursuing their foe, my knights got a flank charge on a second block of Saxons!  Talk about beginners luck!

Against the odds, the Saxons held and turned to face us in a subsequent turn.  Having 2 units of enemy knights roaming on a now hanging flank caused the Saxons to leave shield wall and each large unit turned to face its nearest threat.  I sent my archers and crossbow to harry the Saxon command unit and not surprisingly, they charged off the hill and crushed both of my units. On the upside, the Saxon line was in disarray.


At this point, Real Life intruded.  The game was called short of the finish line because I had to leave to pick up my son.  My last action was to swarm the unit that had been anchoring Brent's left flank.  They'd already been hit once in the flank and survived.  I sent in a second flank charge and amazingly, they survived again.  I hit them from the front and they survived that as well!  These fellows were the heroes of the game because if I'd have broken them, it would have been a path to a Norman victory with my knights pursuing and hitting other units.  As it was, they stood fast and the game was a draw...the most lively draw I've ever fought! All this action in only 3 1/2 turns!

There were many things I loved about Impetus but if I had to sum it up, I'd say I most loved its unpredictability.  From the opening gun, events occur which force you to react in real time. I didn't have perfect control over my troops and that felt just right commanding an impetuous knight army.

Thank you Brent for hosting and teaching me! It was great to combine gaming with one of my many family taxi trips!  The hook has been set.  Impetus has impetuously pushed its way to a front burner on my list of projects.  I ordered the rules over the weekend from Italy and here is a sneak peak at my next project!
These Xyston figures represent two units of Hastati in my new Mid Republican Roman army for Impetus.  Each unit is a single base of 80mm by 40mm.  Instead of the 16 figures I'd have to paint up under Field of Glory, I'm going to do 5 in the front and 4 in the rear.  Plus little bits of color like discarded shields, swords casualties and all.  Back to the painting table!