Pages

Saturday, December 29, 2012

Hungarian heraldry-can you spot the fake?

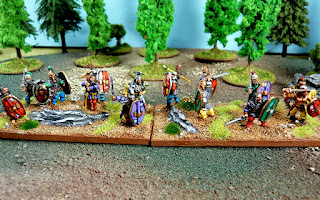
Up next are the Clipeati and Armati.   Clipeati were armored footmen equipped with enormous shields called pavises.  The Clipeati formed a shield wall from which Hungarian infantry could fight or hide behind.  Crossbowmen and handgunners probably operated behind this shield wall.

It helps to have a large flat surface like these pavises when painting heraldry in 15mm.  I used watered down grey or brown to block out the shape of the icon.  Then I filled up the base color and worked up successive highlights.  When the icon was finished, I highlighted the surrounding color one last time to clean up and bring visual interest.  It is a bit of a trial.  You want your paints thinned so that you don't get too much build up but then again, too thin and it runs.  Images with too much detail just doesn't work in this scale.  For example, the severed eagle's leg with an arrow looked great on the web but took forever to paint. Ultimately, it was visually dwarfed by the much simpler egret, goose and goblet heraldry.  I should have just painted all white geese on black shields!

I found my heraldry at a Hungarian website.   Thanks to Chrome's translator, I was able to click through and find what I needed!  I can vouch for the accuracy of the heraldry on the shields above, save one.  As I got to the finish line, I decided to have a bit of fun on one pavise.  +5 points to the first reader who can spot it!

Armati were the armored footmen who fought with the Clipeati. It is not clear what the Armati were armed with but it is assumed they used pole arms for fighting from, over and around the Clipeati pavises.  Overall, I'm pleased with how this mix of figures turned out together.  

Wednesday, December 26, 2012

Mustering the Lights for Corvinus' Black Army

Santa brought me a new Daylight Triple Bright Lamp,  Despite the absence of sunlight, I can start taking pictures and posting King Matthias Corvinus of Hungary and his Black Army.  This is a major upgrade over the workshop light I've been using.  Here's hoping it'll pay dividends with photography and painting in 2013!  

I pitched into the Later Hungarian army v2 project wanting to change my painting and basing style. Some speculate that the Black Army was given its moniker based on their black armor panoply.   If any readers have an opinion on this point, I'd love to hear it!  I experimented with black but as always, straight black in 15mm is a problem visually. I've settled for working black in as much as possible, including the base coat.  From foot soldier to knight, armor will be very, very dark. 

Archers:  I started with a black and white livery but that wasn't working on account of the fur coats.  The very fine detail on these Essex figures made dry brushing a challenge.  Sharp-eyed readers will note the ballast is a change-up from what I usually use.  It's probably a touch too light but with an army composed of 50% cavalry, it'll pay dividends with the 100+ horses in various shades of brown.  


Handgunners:   When I look at these fellows, I'm thinking "Killer Bees."  It doesn't come through in the photos but the yellow triad pops nicely on the tabletop.  


Crossbowmen:  The camera shows all sins and I see I forgot to put a highlight on the quiver case!  D'oh! I do like these Essex poses though.

Next week, I'll post on the heaven and hell that is painting heraldry in 15mm.  With  persistence and some luck, I managed to find a website with medieval Szekler heraldry.  

Tuesday, December 18, 2012

Hungarian project - old dog, meet new tricks

For my Black Army of Hungary project, I'm changing things up.  I've got a system for basing and painting that I use faithfully on every army.  This time, I've decided to look for ways to do things differently. Experiment.  Change it up.  Right out of the gates, I'm having doubts. I've suppressed them by telling myself I can't judge the changes until it all comes together at the finish line.  But I judge. And worry. After all, I'm an old dog.  
Please lord, don't let the red devil kill me in my sleep.  
I've got 100+ foot and 100+ mounted figures to paint.  Almost half of the figures have shields. To scratch-paint heraldry on this many shields, I've got to find ways to save time.

Glue Gun:  First up is a trick I learned from Lurkio, 15mm modeler and painter extraordinaire.  I dug up an old glue gun and I'm hot gluing the cavalry to popsicle sticks. If you've painted Essex horse, you know how much time this'll save. Essex horses are exquisite, my favorite in 15mm, but their bases are easily bent or twisted.  That makes it nearly impossible to put a spot of PVA glue down and call it good.  The trick with the glue gun is to have the figure in hand and press hard  right after the glue goes down. One press and no fiddling to make the bases flat and figures stand up straight.


Army Painter colored primer:  Though quite pricey, I grabbed a bunch of Army Painter colored primers which I'll use to full effect. By priming a strip of mounted figures with a variety of browns,  black or grey, I'll have eliminated the step of blocking in the primary color of the horse.  I'll use a heavy wash over the blocked color and work detail and a highlight in when I paint the tack.  The beauty of this technique is that you get shadowing similar to black lining without the difficulty of painting over blackened tack.

Glue Man to Horse:  I've always painted riders separately from their mount but this time, I'm gluing the figure to the horse prior to priming to save time.  For many poses, Essex has already done this for me!  I don't want to work up from a variety of basecoat colors so I'll go over all riders with black.  The black shadows the hard-to-paint places between the rider and his mount.  And it'll lend itself to a darker effect that I'm looking for in my Black Army.
Since I'm using black on all the riders, I'll  paint faces with black plus flesh combo.  At 3 feet + viewing , it looks quite good in 15mm.

Army Painter colored primer in action.  
Flock it all:  I'm also changing up my flocking.  I once made the mistake of using too dark a color in my basing, which resulted in my cavalry being swallowed up by the color of the bases.  I found a very light colored Woodland Scenic ballast called Buff.  It is so light it's kind of freaking me out.  I'm going to stick with it because it should pay out with all of the cavalry & the variations of brown I'll use in painting them. I've had to remind myself that the point of basing is to showcase the figures. If the point of the basing was to realistically display ground cover, I'd use the "all green"  flocking method.  This one has a serious downside if I hate it at the finish line.

Accept feedback:  For me, painting is a quiet, solitary experience.  Some of you fellows belong to painting clubs and for you, painting is a social event. I've even heard of painters who paint via webcam just to get conversation and feedback as they go.  When I mentioned this idea to my family, they thought webcam painting was a little over the top.  I should point out that my kids are teens and thus, my very exsistence is a bit of an embarrasment to them!

For now, I'll settle for sharing photos.  My friend Gilles already pointed out some of my work was a bit dark.  I knew it to be true but I needed to hear it from someone else before going back and redoing highlights a tone higher. In 15mm, as in life, you just can't be subtle!

Monday, December 10, 2012

Going Gallic

Closing the book on my Gallic project, I'm compelled to share a True Story (TM) of my youth.  It seems like a satisfactory exclamation point to the topic, so here it goes.

After graduating from High School, my friends and I spent our summer nights hanging out before we went our separate ways.  In Phoenix, Arizona, homes often have a swimming pool on account of the oppressive desert heat. Being teens, we chose to hang out at the house/pool with absentee parents. On this Saturday night,we'd gotten together for a swim party.  Us guys were in the pool and the girls were outside of it, hair and makeup neat, paying us no attention at all.  Our ringleader Jim called us boys together in the deep end and as we tread water, he said softly “On the count of 3, pull off your swimsuits and wave then at the girls!” 

Off went the countdown, “1, 2… 3!!!” Off came my swimsuit and I waved mine wildly at the girls.  Then it hit me, mine was the only one in the air. Before I could comprehend the depths of the treachery I was about to suffer, I was dunked and held under water while my suit was ripped from my hand.  By the time I was allowed up for air, Jim was out of the pool with my suit.  The rest of the guys followed him, hooting and hollering as they paraded my swimsuit through the party to a large tree.  There they hung it from the lowest branch with great ceremony and insults to my intelligence. 

I was straight as an arrow back then but even an arrow bends when enough pressure is applied.  I swam to the edge of the pool and panicked.  Everyone was laughing at me.  They wanted me to beg, no, plead for my swimsuit back.  I knew they wouldn't soon relent.  No, they’d drag the joke out and make me suffer.  The pressure to act grew with the taunts and staring.  I had to put an end to their game. Without fully understanding it at the time, I decided to go Gallic. 
Roman dogs, give me back MY swimsuit!!!  
In a single motion, I lifted myself up out of the pool. I did not run.  I did not trot.  I made no attempt to hide my nakedness. I strode calmly through the crowd with my head up and eyes straight ahead.  I walked as if I were wearing pants.  I knew I could show no weakness, fear or shame.  And it worked.  As soon as I was out of the pool, the laughter and taunts stopped.  The crowd watched in stunned silence as I walked to the tree, pulled my suit down and put them on as as if I were dressing in the privacy of my bedroom.  This was NOT the way the prank was supposed to play out.  Game over. While the long walk is burnished into my memory, I can't remember anything from the rest of that night.  

Livy recorded that the Celts of Asia Minor fought naked: "The Insubres and the Boii wore trousers and light cloaks, but the Gaesatae, in their love of glory and defiant spirit, had thrown off their garments and taken up their position in front of the whole army naked and wearing nothing but their arms... The appearance of these naked warriors was a terrifying spectacle, for they were all men of splendid physique and in the prime of life."

Once in my lifetime, I too was a terrifying spectacle.  Never before or since have I done anything remotely like this.  If surrounded, pressed and hounded by my enemies, I know what to do.  Show no fear, stand tall and go Gallic!  And of course, pants optional!  

Wednesday, December 5, 2012

Impetus Gallic army on parade!

This spring, I painted Mid Republican Roman, Pontic and Gallic armies for Impetus.  I finished my Gauls in May and wrapped up the project with a ton of pics.  Unfortunately, the pics turned out to be garbage (arg!) so this post went on the back burner until I could reshoot them. Photography is my least favorite part of this hobby but I finally got them lined up and photographed.  Here's the first and last muster of my Impetus Gauls before they left for a new home.  Boys, we hardly knew ya!

Naked Warriors:  These were easy to paint thanks to the great sculpts by Xyston-clearly a fit and trim bunch.  While sculpting the hills and cliffs with clay was a messy and slow business, the end results were decent!


Light Cavalry:  To my mind, the Impetus method of using one base per unit is genius.  Light horse looks like lights, do they not?  And you have the space to tell a story.
Medium Cavalry:  Looking suitably tough as they descend a hill to loot a camp near you.
Light Chariots:  Xyston doesn't do Gallic chariots so I grabbed these from Splintered Light Miniatures. I was very pleased with them, especially the shaggy ponies. Splintered Light is another top miniature modeler.


Javelinmen Skirmishers:  In Impetus, a skirmisher base is 20 mm x 80 mm. I doubled these up for the visual effect.


Warriors: 10 bases of warriors.  Xyston command packs have some heroic poses and the basing allows these figures to shine.  


While Impetus did not catch fire in our group, I don't regret this project for a moment. This was the most fun I've had painting minis to date.  I love the spacing and opportunity to tell a story on a single base. I love painting each figure with great care, knowing the basing allows the extra efforts to be seen.  I also love the game itself!  The only part I didn't care for was my armies sitting in boxes and not seeing the light of day.  To that end, I put my unused armies up for sale for an end-of-year reset.  Off went my gladiators and all 3 Impetus armies.  The upside is:
  • 2 gentlemen in Kansas City will use my Romans and Pontics for a tabletop adaptation of Command and colors.  
  • A gentlemen in Wisconsin will use my Gauls in his Roman v. Barbarian slugfests. 
  • A gentlemen in Kentucky will surprise his club with my gladiators on game night.
  • I'm getting a commission as well, which means I'm not done painting and basing Impetus.  
  • Lastly, I have funds for my next project.  On to the next thing!