Pages

Thursday, September 17, 2015

Bolt Action-Opening day of Operation Epsom

Bolt Action has an active following in the Twin Cities. A Facebook group started over the summer quickly grew to 50+ members with multiple posts a day.  The energy and excitement of this group nudged Hugh and I to finally give it a go.  Hugh drew up a scenario based on the fight for St Manieu in Normandy using the book Over the Battlefield - Operation Epsom as inspiration. With low altitude battlefield pictures taken by Spitfires, it's ideal for designing scenarios.   
Hugh used the BA 'Point Defense' scenario for the basic structure and added an OOB of 1000 points per side. It featured the untested 15th Scottish infantry vs. the heavily depleted 12th SS HitlerJügend. The Scots got a flame throwing Crocodile (historically commanded by a LT Harvey) and the HJ got a Pz IV and some Panzerfausts. 

How did our first foray into BA go? Splendidly!  The table was gorgeous as were Hugh's figures. BA is simple enough that I picked up the basics our first time out and we were able to play two games in just over 5 hours.  The British preparatory bombardment was effective, leaving most of my German units pinned.  However, their veteran status allowed them to recover from pinned status fairly quickly.  

In the early game, Hugh was very effective in pushing up the middle and seizing the ruined house. The Crocodile is a heavy tank so it was slow in approaching my position. Thank goodness for that as I was in fear of its flamethrower.


Hugh was making good progress when his Forward Observer called in artillery strike that went awry. It dropped onto his right wing traversing a farm field.  The results were devastating, taking two squads out of the game.  The loss of momentum on this wing doomed the offensive.


My Panzer IV couldn't damage or slow the Crocodile.  When hit by the flamethrower, the crew panicked and were useless the rest of the game. At games end, the Scots failed to capture the 3 objectives. First victory was notched by the Germans.


In the second game, our fortunes were dramatically reversed.  The Allied preparatory bombardment was effective as was their follow-up artillery strikes, taking out my 2nd Lieutenant.   This loss meant my units had difficulty rallying up. My pinned units were much less effective in holding up the British advance.  


The Croc's first blast of flame took out most of my squad covering the road, with only my squad leader surviving.  In one of the more memorable moments of the game, Hugh sent in a 7 man squad to finish off my squad leader and clear the building. Against all odds, he inflicted more hits on the British squad and the Scots were destroyed. Apparently, Sgt. Steiner was in that house! Despite this temporary setback, Hugh secured 2 of the 3 objectives and quickly sealed a victory.  


Bolt Action gets a big thumbs up from both of us.  It's a fast and fun gaming experience.   The dice draw for activating units shatters "IGOUGO" in a brilliant way and leads to many tense moments in the game.  Bolt Action and Chain of Command give you two very different takes on WW II skirmish combat.  Bolt Action is first and foremost a game, easy to pick up and play. Chain of Command has more complexity and depth with an emphasis on simulating command friction.  They each have much to recommend and give you two different gaming experiences.  Trailape's Wargame blog has a fabulous side by side comparison of these two systems you can read here. Click and read it now!

Historically, the opening day of Epsom, June 26, 1944, was a rough one for both sides. Rifle companies were reduced to weak platoons lead by NCOs and junior lieutenants.  It ended poorly for the Scots as well as LT Harvey. His Croc burst through a high wall during the attack only to be knocked out by a Panzerfaust on the other side.  Taken prisoner, the crew was not seen alive again. Their sad fate was never far from my mind during our game.

Wednesday, September 2, 2015

Mustering the Byzantines!

My big accomplishment this summer was painting a Byzantine warband for SAGA. The best part of the project was using a bright palette with a Dark Ages army.  That, plus I painted these for myself.

Byzantines are a challenging faction to run in SAGA.  Their battleboard rewards tight deployment and thoughtful interaction between each part of your warband. Levy skirmishers shield the main line. Warriors shield the bowmen, who have the unique in game ability to shoot over their own troops and into melee. Mounted hearthguard are held back until they can charge and recoil from the enemy at a critical moment.  I painted up Steppe Tribes for another option as well!
Warriors (Kontaratoi):  The banners are printouts of Byzantine-inspired iconography. They matched my color scheme and the Little Big Man Studio shield transfers quite nicely!


Bow armed Warriors (Toxotai): These fellows punch well above their weight.  There are a number of plays on the Byzantine battleboard to keep them safe and to shoot into combat or support of combat.  If you're successful at shielding them properly, it'll be a maddening game for your opponent.
Javelin-armed Levy: Thanks to a battleboard ability that allows them to activate more than once in a turn without fatigue, they'll be more than a nuisance to the enemy.
Steppe Tribe:  Treated as levies, they too can activate more than once a turn without generating fatigue and that makes them a great one-two punch with javelin-armed levy. The downside is they generate no SAGA dice. With two units of levy, you'll have to make up your SAGA dice elsewhere in this warband.

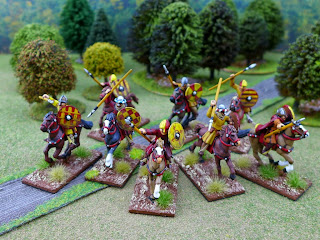
These Foundry's Scythians are Perry Bros sculpts. They're stupendous sculpts with loads of detail.  I was looking for an excuse to paint these ever since I acquired them last year.  Once I confirmed Scythians served in Byzantine army, I put them on the table for this warband.  By 700- 900 AD,
Scythian fashion was surely changed from whats portrayed here but I'm using them anyway. Eventually, I'll paint up something more historically accurate to replace them.  For now, they're quite lovely and annoying to my opponents as they race in to shoot, shoot again and then race away.
Hearthguard (Kavallaroi):  Though few in number, they're critically important for delivering a knockout blow. The KONTOS ability allows them to roll a die for each figure ending a turn in melee. For each die roll of 4 or more, they dish out an extra hit.  And that's before you roll your melee dice!  

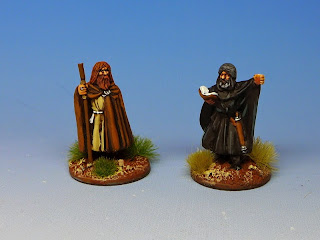
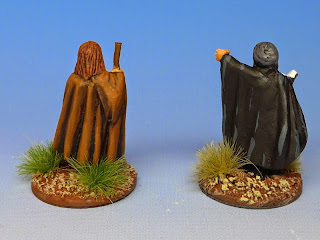
Greek Fire turn counter:  This was just a nice bit of fun and a way to put these nice figures to work in SAGA.  Great figures, Gripping Beast,  and this turn counter helps me keep track of the turn!


Warlord (Strategos): I fumbled this one a bit.  The detail on the horse's armor was very shallow so I used thinned base colors.  When I hit them with a wash, it settled into the grooves and gummed up the detail completely.  From gaming distance, its not noticeable. Close up, its a mess. Ah well, onward and upward!
Surprising everyone, the Byzantines are unbeaten in our summer SAGA campaign. I'd like to say it's due to my brilliant generalship but that would be a fib.  All my games were close, with the Byzantines getting hot down the final stretch.  Heads up to all Byzantines players...you're required to shout "For Basileus!" before throwing your dice during critical moments.  It's worked for me all summer long!  

Saturday, August 22, 2015

Desert terrain

I joined a SAGA Crescent & Cross campaign this summer.  My desert terrain collection was stuck at "none" so I had a bit of work to do to get ready for our games.  Since we play in a FLGS, I needed a portable playing surface that was suitably desert-y. I want to make a desert gaming mat some day but for simplicity, I bought desert-colored felt from Joanne's Fabrics.  For under $10, it looks quite nice and travels well. Score!   

I then put together my 4Ground Arabic dwellings. These superb kits are easy to assemble, packed with detail and each has an accessible interior.  I also flocked and painted some MDF to serve as hills, wadis, dunes or rocky outcroppings as needed.  
This Architects of War's  resin kit well went together nicely. Water effects are done with Woodland Scenics' Realistic Water.
The palm trees are by Pegasus Hobby. Primed, painted and flocked, they're a nice down-payment on my own grove.
I had some painting to do for our campaign as well as we're allowed to field two warbands.  My first is the Spanish as they're simply a blast to play. I buffed the Spanish with Gripping Beast's El Cid figure.  I'll run him as warlord and perhaps as the Hero El Cid as well. Clearly, the warlord and his bannerman have the same great taste in colors.   

I've had unpainted Byzantines in my lead pile for almost a year.  Byzantines fit in perfectly for the Crusades so I painted them up as my second warband for the campaign.  My post is getting quite long so I'll post up the Byz next time.  Cheers! 

Friday, August 14, 2015

WQB is out and...

I made the cut!  My article "SAGA Do's and Don'ts" was published, along with some of my SAGA painting.  It's an honor & pleasure to be published! Time for a beer or two to celebrate. This is the weekend after all! Millsy and his mates have done a fabulous job so again download your PDF copy here.


About the blog going cold...I've been struggling with my vision a bit.  I sit in front of a PC all day at work.  At night, I blog, surf and paint for hours on end. It's little wonder that I earned myself a really bad case of eye strain. I cut way back on my screen-time and painting this summer to turn it around.

No worries!  Even at a much reduced rate of painting, I finished Byzantines in time for a SAGA campaign and I have Russians for Bolt Action under way. This bump is a reminder that I'm not bulletproof and that balance in life is important.  Lesson learned!

Thursday, May 14, 2015

SAGA Do’s and Don'ts

One thing I love about SAGA is that locally, it keeps attracting new players.  With that in mind, I 'm going to play the role of "Average Dad" and dole out some advice to new SAGA players.

Don’t play the same warband against the same enemy in the same scenario over and over again.  I did this as a new player, only to see my Normans repeatedly whipped by the Irish. All those losses can lead a person to conclude that the game or faction is broken.  Trust me, it's not. Every faction has unique strengths and weaknesses that play out differently in each scenario and with different opponents.  Change up scenarios, change up opponents and you’ll change up the results as well. 

Do keep it fresh.  There are 7 scenarios in the original rule book and 8 more in The Crescent and The Cross.  Additional scenarios are posted on the Studio Tomahawk forum, along with variations on the originals.  Try dicing for a random scenario to play  and play back-to-back games if you have time.  Variety is what makes SAGA really shine!

Don’t let your lone warband hold you back from playing other factions.  When you get down to it, the Jomsvikings look like Pagan Rus, who look like the Vikings, who look like the Anglo-Danes, who look like the Anglo-Saxons.  The Irish look like the Norse-Gaels and the Normans look like the Bretons who look like Spanish who…you get my point.  You don't have to worry about insufferable historical purists in SAGA as they're all in Napoleonics (kidding!).  As long as your opponent can tell your warriors from your hearthguard, you’re good to go. I also recommend you proxy a warband you're thinking of painting to make sure you enjoy their style of play.  

Do use SAGA as an excuse for a deeper historical dive!  Thanks to SAGA, I've read about peoples and periods I'd never read about before.  Painting Byzantines led me to Lars Brownworth’s superb “Lost to the West.” From there, I continue to read, think and dream about the Byzantine empire.  Painting Norse-Gaels led me to the Battle of Clontarf and the story of the Vikings in Ireland. From there, I discovered the fascinating story of the Norse conversion from paganism to Christianity. Beware! Once you start down the rabbit hole, you'll likely find you cannot get back out.  
  
Don’t judge a battle board by its cover. You can’t see the strengths and weaknesses of a battle board without putting it in play.  When The Crescent and The Cross was released, I dismissed some faction out of hand because the battle boards looked weak.  The first time I played the Spanish, I moaned about their terrible board until suddenly, it clicked.  I found a sweet combination that helped steal a victory!  The Spanish have gone from "terrible" to my current favorite faction.  Take a chance and you might find a new favorite too.

Do try this game with your favorite beverage of choice.  It's not so hard that you have to be a Jonathan Nash (A Beautiful Mind) to manage the rules.  Field of Glory, I'm looking at you!

Don't let perfect be the enemy of good enough painting.  Setting the bar too high for yourself can result in a warband that you never finish. Block paint or block paint, wash/dip if you like. The key is to keep moving forward and put a warband on the table, not win "Best Painted of 2015."     

Do have fun!  After all, that’s the reason we all come out to play!


I finished a pagan and Muslim priest for our upcoming SAGA campaign. At some point, I'm going to have to paint up a bard as well.  The fellow in black took a couple of tries to get right.  I tried neat, dark triads but at the finish line, he had turned grey.  Out came the black paint for a reset and just the lightest touches of grey over it.  This was a time when less was better!


I finished 8 more jinetes for my Spanish warband, including a linen war banner.  My 4th try is my best yet, I think!  I worked up from black to hull red to red/yellow to the highlights. I followed Michael's advice and painted in a wet-brush fashion so some of the black base color peeks through.


Monday, May 4, 2015

An Elephantine Drop

aka "Eureka, I finished the Punic Wars project!"

Carthaginian Elephants: I painted 5 with Carthaginian motifs and 5 without so they could port to a Pyrrhic army.  The ellies didn't have much in the way of skin folds so I used a triad of greys to paint wrinkles in.  Elephants are the natural centerpiece of the Carthaginian army and I think these can shoulder that burden.


Carthaginian 4 horse chariots:  The chariots are for the option of running an Early Carthaginian army.
Carthaginian Armored African Veterans: A close look shows them kitted out in Roman gear. I painted the black shields with white palm trees, making them the original Afrika Korps.


Carthaginian Heavy Cavalry: They'll lock up the Roman Cavalry to the front while their Numidian allies ride around to the flanks and rear.

Libyan Javelinmen & Balearic Slingers: Few though they are, they'll tie up the enemy skirmishers.

Up next is the Spanish arm of Hannibal's army.  The Spanish are my favorite War & Empire sculpts. As is traditional with the ancient Spanish, you can have a bit of fun with bright colors.

Round Shield Cavalry: The Spanish lights are a colorful bunch.  Even if they don't win in skirmish, they'll look marvelous riding around on dressed up ponies.

Long Shield Cavalry: The heavies are ready to rumble!


Heavy Scutarii: They'll challenge the Roman Legions in the open ground and on a good day,  maybe even push them back.

Spanish Slingers: Because you can never have too many skirmishers.

Medium Scutarii:  The nice thing about basing 3 figures per base to represent medium foot is the lads get to have a bit of elbow room.


I can check "paint a lot of figures in a short period of time" off my bucket list. If you're looking to paint up ancients in 15mm, take a look at the Forged in Battle collection. We lost Covus Belli's ancients months ago so its a relief to see West Wind step into the breach.  Along with a deep bench of armies, they have great color items up on the builds accessories page.  Things like engineers, villages, villagers, temples, ramps, siege towers battering rams and more!  

I'll  be on the road shortly. A little rest for the eyes and then, back to it with SAGA and Bolt Action projects.